
Free Delivery  ·  COD Available  ·  15-Day Returns
Pricio
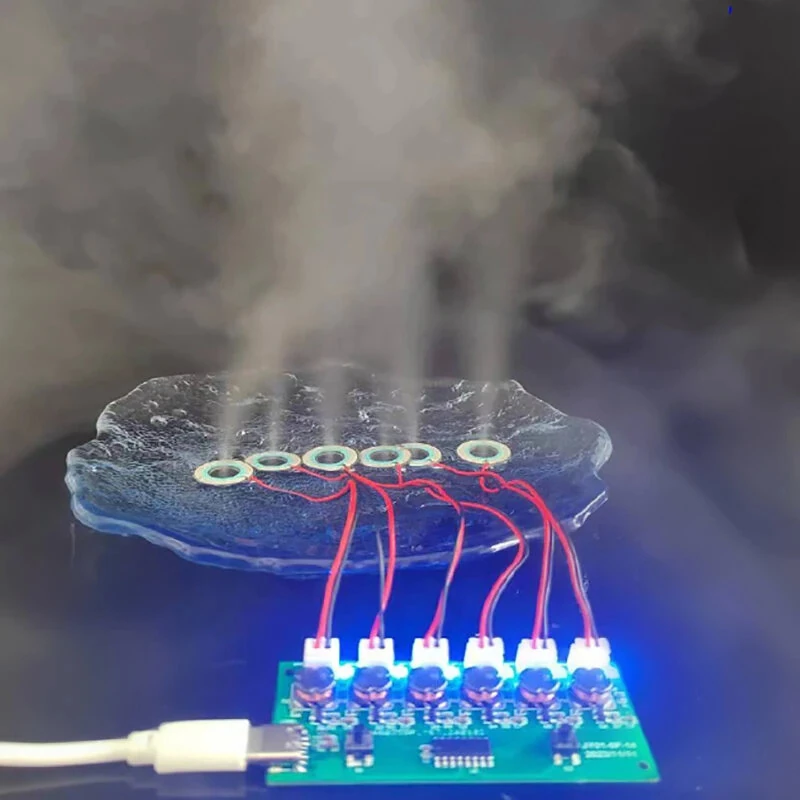
Ultrasonic Nebulizer DIY Kit Six Spray Atomization Module Type-C 108KHZ 5V Mist Maker Module Atomizer Circuit Board Assembly Humidifier Accessories — image 1
Hover to zoom

1 / 7 · Click to enlarge

Ultrasonic Nebulizer DIY Kit Six Spray Atomization Module Type-C 108KHZ 5V Mist Maker Module Atomizer Circuit Board Assembly Humidifier Accessories

5.01 rating
356+ bought in last month
AI Summary
product for DIY enthusiasts and makers

The Ultrasonic Nebulizer DIY Kit Six Spray Atomization Module Type-C 108KHZ 5V Mist Maker Module Atomizer Circuit Board Assembly Humidifier Accessories is a value-for-money product designed for DIY enthusiasts and makers.

₹951-37%
MRP:₹1,503Save ₹552
Free Shipping💵 COD Available

Available Offers

Free Delivery on this order. No minimum order value.

15-Day Easy Returns — hassle-free return & full refund.

Secure Payment — 100% safe checkout with UPI, Cards & Net Banking.

37% Off — you save ₹552 on this product!

Price: ₹951

Total: ₹951
Buying tip: A well-rounded choice at a fair price. Recommended for most buyers.
Estimated delivery: 26 Aug9 Sept
Free Shipping
Pan India delivery
15-Day Returns
Hassle-free policy
Secure Payment
Razorpay protected
Quality Assured
Vetted products only

Available Offers

💳

5% Cashback

Pay with UPI & get 5% cashback (up to ₹50) via Razorpay

🏦

No-Cost EMI

Available on select bank cards at checkout. 0% interest for 3 months.

📦

Free Shipping

Free delivery on all orders. No minimum order value.

💵

Cash on Delivery

COD available on orders up to ₹5,000 across India.

Ideal For

Hobbyist flyingOutdoor recreationKids entertainment
Share:
SKU: bg-2050508

About This Product

The Ultrasonic Nebulizer DIY Kit Six Spray Atomization Module Type-C 108KHZ 5V Mist Maker Module Atomizer Circuit Board Assembly Humidifier Accessories is a value-for-money designed for DIY enthusiasts and makers. It delivers reliable performance at an accessible price.

Why Buy from Pricio?

Pricio sources this product directly, cutting out multiple middlemen. Every order includes free shipping, a 15-day return policy, and secure payment via Razorpay.


Specifications:
Material: 1.2MM FR-4
Power Interface: TYPE-C
Rated Voltage: DC 5V
Rated Current: Minimum 2A
Power Range: 2.5-3W
Atomization Frequency: 108KHZ ± 2KHZ
Module Dimensions: 65 x 30MM (2.56 x 1.18IN)
Bracket Dimensions: 25 x 38MM (0.98 x 1.50IN)
Cotton Swab Dimensions: 8 x 100MM (0.31 x 3.94IN)

Nebulizer:
Drive Voltage: 5V
Resonant Frequency: 108-110KHZ ± 5
Rated Power: 2W
Punch Count: 1100
Micropore Aperture: 4-5UM
Silicone Sleeve Diameter: 20MM
Rubber Ring Thickness: 3MM
Steel Plate Diameter: 16MM
Wire Length: 40CM
Wire Terminal: PH2.0

Features:
1. Universal Type-C Connection: Equipped with upgraded TYPE-C interface for easy compatibility and hassle-free operation.
2. Multi-Functional Atomization Modes: Supports single spray, dynamic spray, and six simultaneous sprays for varied mist output.
3. Ready-to-Use Assembly: Includes necessary components, such as brackets and cotton swabs, for effortless setup and implementation.
4. Efficient Atomization Process: Utilizes micropore technology to transform water into fine mist particles for effective dispersion in the air.
5. Compact Functional Design: Lightweight and carefully optimized driving module guarantees stable operation without consuming excessive energy.

Package Included:
Board Only:
1 x Atomization Module

or

DIY Kit:
1 x Atomization Module
6 x Cotton Swabs
6 x Brackets
6 x Atomization Plates


Product Safety Information

Setup Guide

1
Identify the pins
Locate VCC (power), GND (ground), and data pins (SDA/SCL for I2C, MOSI/MISO for SPI, or TX/RX for UART). Refer to the pinout diagram on the product page.
2
Wire to your microcontroller
Connect VCC to 3.3V or 5V (check the module spec), GND to GND, and data pins to the appropriate GPIO pins on your Arduino or Raspberry Pi.
3
Install libraries
In Arduino IDE, go to Sketch → Include Library → Manage Libraries and search for the sensor library. Install the recommended version.
4
Upload example sketch
Open File → Examples → [library name] → Basic Example. Upload to your board and open Serial Monitor to view output.
5
Calibrate if needed
Some sensors (temperature, humidity, distance) may need a short warm-up period or calibration. Run the calibration sketch if provided.