Free Delivery  ·  COD Available  ·  15-Day Returns
Pricio
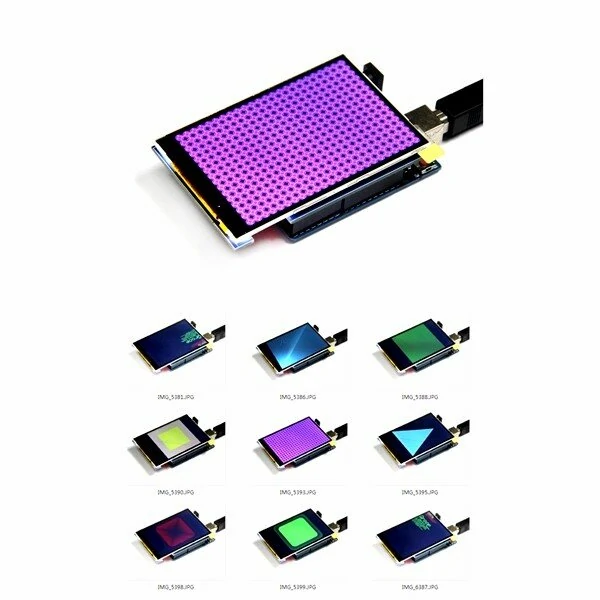
3.5 Inch TFT Color Display Screen Module 320 X 480 Support UN0 Mega2560 Geekcreit for Arduinno - products that work with official Arduinn0 boards — image 1
Hover to zoom

1 / 10 · Click to enlarge

3.5 Inch TFT Color Display Screen Module 320 X 480 Support UN0 Mega2560 Geekcreit for Arduinno - products that work with official Arduinn0 boards

5.06 ratings
630+ bought in past month
AI Summary
Display Screen for everyday users

The 3.5 Inch TFT Color Display Screen Module 320 X 480 Support UN0 Mega2560 Geekcreit for Arduinno - products that work with official Arduinn0 boards is a mid-range display screen designed for everyday users. Customers praise its excellent build quality and fast and responsive.

excellent build qualityfast and responsiveclear and bright displayaccurate and reliable
₹1,602
Free Shipping💵 COD Available

Available Offers

Free Delivery on this order. No minimum order value.

15-Day Easy Returns — hassle-free return & full refund.

Secure Payment — 100% safe checkout with UPI, Cards & Net Banking.

Price: ₹1,602

Total: ₹1,602
Buying tip: A well-rounded choice at a fair price. Recommended for most buyers.
Estimated delivery: 17 Aug31 Aug
Free Shipping
Pan India delivery
15-Day Returns
Hassle-free policy
Secure Payment
Razorpay protected
Quality Assured
Vetted products only

Available Offers

💳

5% Cashback

Pay with UPI & get 5% cashback (up to ₹50) via Razorpay

🏦

No-Cost EMI

Available on select bank cards at checkout. 0% interest for 3 months.

📦

Free Shipping

Free delivery on all orders. No minimum order value.

💵

Cash on Delivery

COD available on orders up to ₹5,000 across India.

Ideal For

Everyday convenience
Share:
SKU: bg-1983523Category: Display Screen

About This Product

The 3.5 Inch TFT Color Display Screen Module 320 X 480 Support UN0 Mega2560 Geekcreit for Arduinno - products that work with official Arduinn0 boards is a mid-range display screen designed for everyday users. Customers highlight its excellent build quality and fast and responsive.

Why Buy from Pricio?

Pricio sources this product directly, cutting out multiple middlemen. Every order includes free shipping, a 15-day return policy, and secure payment via Razorpay.

Description:
Support UN0 and Mega2560 and other development board DIP, Without any wiring, all open source,  libraries offer
The backlight always on, can not control the backlight, backlight is connect to 3.3V
DC: 5V
More information: >>>><<<<

Note:
The control and driving circuit of TFT modules is low voltage and  FRIDA micro-power CMOS circuit, can be easily damaged by static, static damage is an irreparable damage, and sometimes human have hundreds of volts of high voltage static electricity, therefore, in handling, assembling and use should be extremely careful to prevent static electricity: 
1. Using soldering iron or  power FRIDA tools must be well grounded and operation, make them without leakage;
2. Do not use hand to touch the leads, circuit board and metal boxes; 3. Do not use a vacuum cleaner for cleaning, because it generates strong static electricity;
4. When the air is dry, can also generate static electricity, therefore, workshop humidity  shall be above RH60%;
5. If it is necessary to direct contact it , should enable the human body in the same potential with the modules? ormake  human body be well grounded;
6. Remove or back in the bags or move locations, also need to be careful to prevent static electricity. Don't replace or discard the original packing.
Package included:
1 x 3.5 Inch TFT Color Screen Module 320 X 480 Support UN0 Mega2560


Product Safety Information

Setup Guide

1
Identify the pins
Locate VCC (power), GND (ground), and data pins (SDA/SCL for I2C, MOSI/MISO for SPI, or TX/RX for UART). Refer to the pinout diagram on the product page.
2
Wire to your microcontroller
Connect VCC to 3.3V or 5V (check the module spec), GND to GND, and data pins to the appropriate GPIO pins on your Arduino or Raspberry Pi.
3
Install libraries
In Arduino IDE, go to Sketch → Include Library → Manage Libraries and search for the sensor library. Install the recommended version.
4
Upload example sketch
Open File → Examples → [library name] → Basic Example. Upload to your board and open Serial Monitor to view output.
5
Calibrate if needed
Some sensors (temperature, humidity, distance) may need a short warm-up period or calibration. Run the calibration sketch if provided.